Windows Subsystem for Linux (WSL) is pure awesome, and WSL2 is even more awesome. (If you’ve never heard of it before, it’s Linux running inside Windows 10 – not as a virtual machine or emulator, but as a fully supported environment that shares the machine.) I’ve been testing WSL2 for a few months now as my local development environment. The performance benefits alone make it worth it. However, there is one problem with WSL2: there isn’t a trivial way to do automatic backups.
In this tutorial, I will explain the difference between WSL1 and WSL2, and how you can set up automatic backups of WSL2. This is the setup I use to backup all of my WSL2 instances, and it integrates nicely with an offsite backup tool like Backblaze, to ensure I never lose an important file.
The Difference Between WSL1 and WSL2
Under WSL1, the Linux filesystem is stored as plain files within the Windows 10 filesystem. As an example, this is the path for my Pengwin WSL1 filesystem:
C:\Users\valorin\AppData\Local\Packages\WhitewaterFoundryLtd.Co.16571368D6CFF_abc13dg56asfw\LocalState\rootfs
Inside that directly you’ll find the usual Linux directories, such as etc, home, root, etc. This makes backing up WSL2 trivial. Your existing backup program can read the files in this directory and back them up when they change. It’s super simple and just works.
Important: Do not modify the files in this directory, ever. This can corrupt your WSL1 instance and lose your files. If you need to restore files from your backup, restore into a separate directory and manually restore back into WSL1 via other methods.
However, under WSL2 the Linux filesystem is wrapped up in a virtual hard disk (VHDX) file:
C:\Users\valorin\AppData\Local\Packages\WhitewaterFoundryLtd.Co.16571368D6CFF_kd1vv0z0vy70w\LocalState\ext4.vhdx
Using a virtual hard disk in this way greatly enhances the file IO performance of WSL2, but it does mean you cannot access the files directly. Instead you have a single file, and in the case of my Pengwin install, it’s over 15GB! (If you’re not careful, it’ll grow huge!)
As such, unlike the trivial backups we get for WSL1, we cannot use the same trick for WSL2. Many backup tools explicitly ignore virtual disk files, and those that do try to back it up will have trouble tracking changes. It may also be in a locked/changing state when a backup snapshot tries to read it… ultimately, it’s just not going to end well.
My WSL2 Backup Solution
My first idea for backing up WSL2 was to rsync my home directory onto Windows. It turns out this approach works really well!
I use a command like this:
rsync --archive --verbose --delete /home/valorin/ /mnt/c/Users/valorin/wsl2-backup/
The above command is wrapped this inside ~/backup.sh, which makes it easy to call on demand – without needing to get the parameters and paths right each time. Additionally, I added some database backup logic, since I want my development databases backed up too. You’ll find my full ~/backup.sh script (with other features) at the end of this post.
This method works incredibly well for getting the files into Windows where my backup program can see them and back them up properly. However, it is also a manual process.
Some users have suggested using cron within WSL2 to trigger periodic backups, however the cron still relies on WSL2 to be running. As a result, you’ll only have backups if your WSL2 is up when your backup schedule is configured to run. That means cron isn’t the most reliable solution. As an aside, I have also seen reports that cron doesn’t always run in WSL. Note, I haven’t tested this myself, so I don’t know the details (i.e. use at your own risk).
Automating WSL2 Backups
After some creative searching, I discovered the Windows Task Scheduler. It’s the equivalent to cron/crontab on Linux, and allows you to schedule tasks under Windows. I had no idea such a thing existed, although, in hindsight, it seems pretty logical that it would. Using the Task Scheduler, we can set up automatic backups for WSL2.
You can find it by searching for Task Scheduler in the start menu, or by looking in the Windows Administrative Tools folder.
Once it opens, you’ll see something that looks like this:
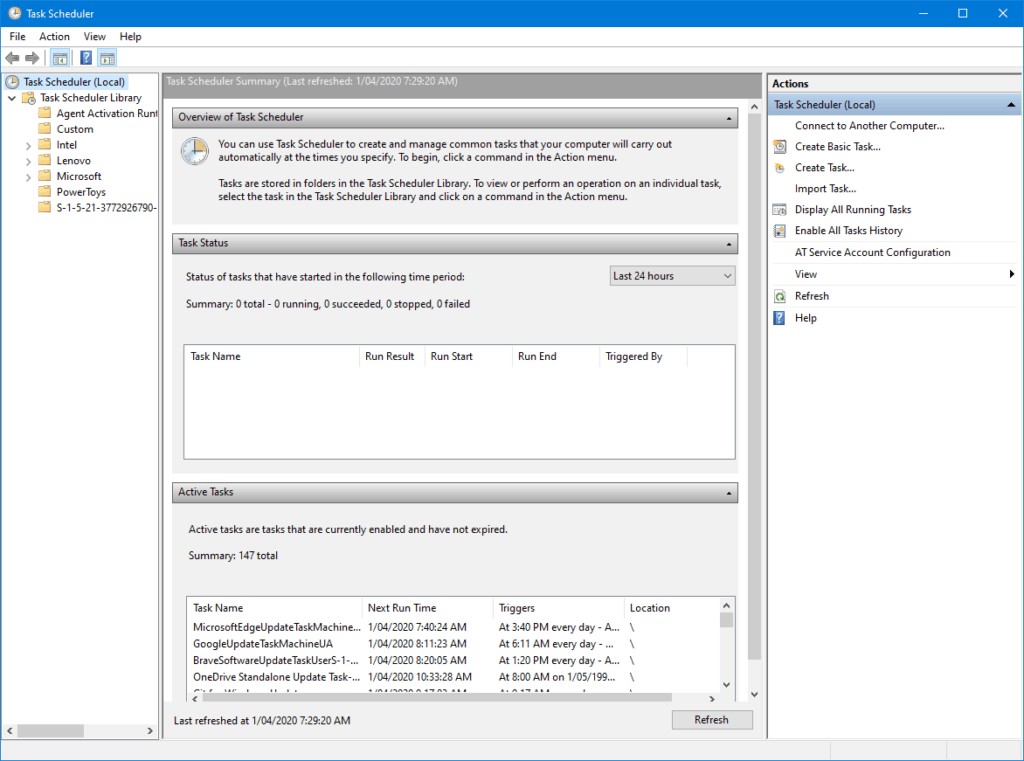
With the Task Scheduler, we can tie our manual rsync based backup up to a schedule.
To set up our automated backup, I’d recommend first going into the Custom folder in the left folder pane. It’ll keep your tasks organised and separate from the system tasks. From there you can select Create Task… in the actions list on the right.
The following screenshots show the configuration I use for my backups, customise as suits your needs. I’ll point out the settings that are important to get it working.
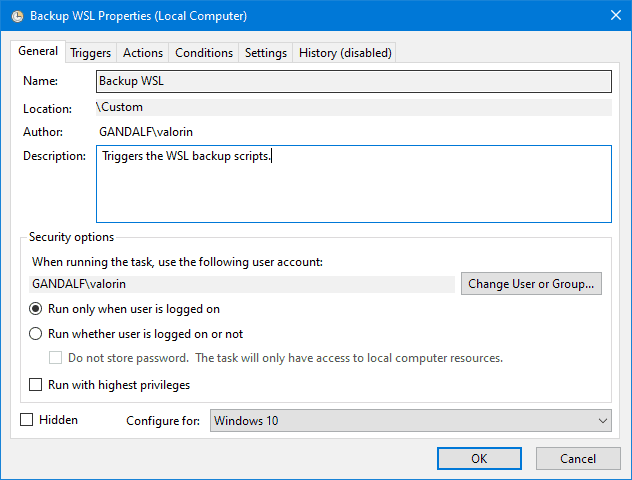
Set Configure For to: Windows 10
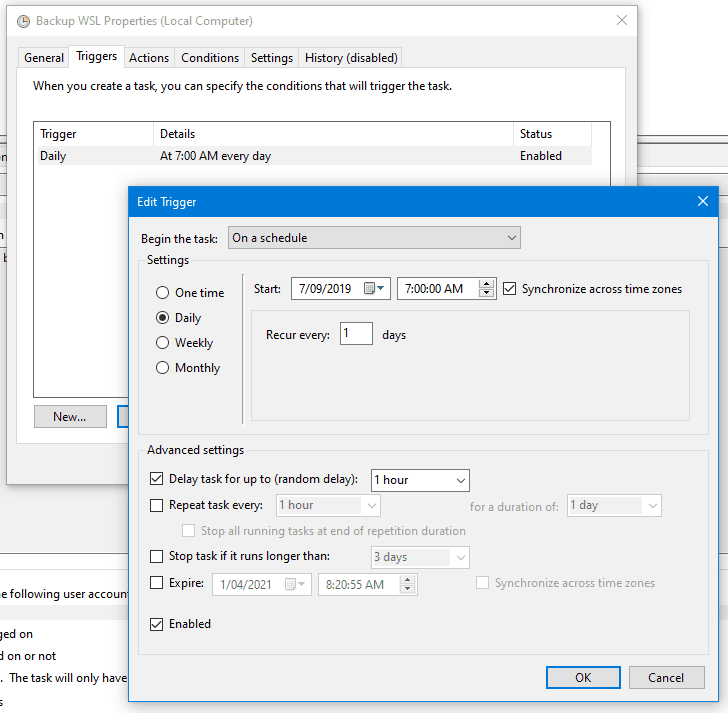
Click New to create a new trigger, which will launch the backup. I have mine configured to run daily on a schedule, starting at at random time between 7am and 8am. Don’t forget to check Enabled is ticked.
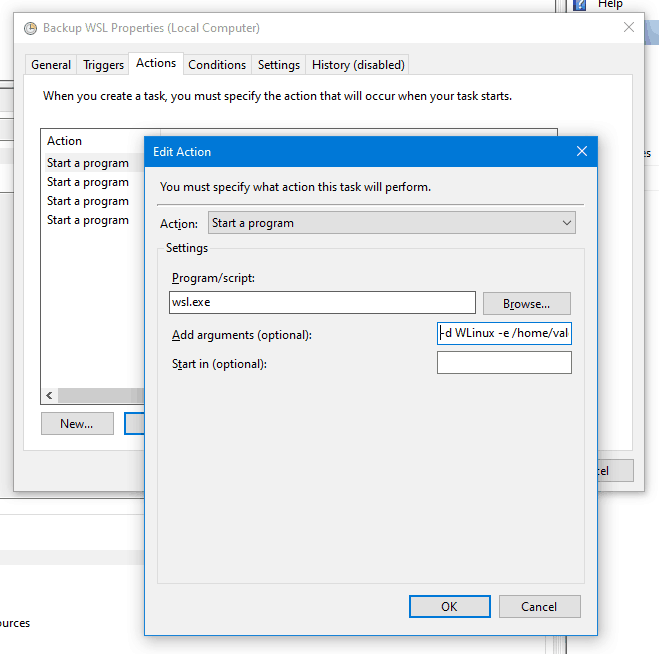
Click New to create a new action, which is how the backup script is executed.
Set Program/script to wsl.exe
Set Add arguments to -d WLinux -e /home/valorin/backup.sh
This executes WSL with the distribution WLinux (Pengwin), executing the script /home/valorin/backup.sh.
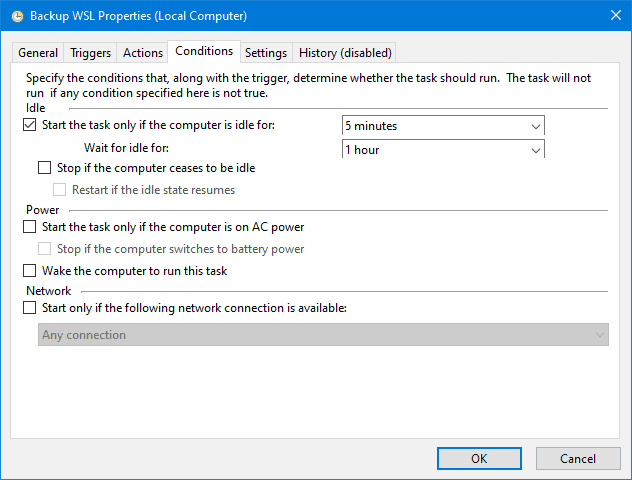
You can control the special conditions when the backup script runs in this tab. Mine waits for the computer to be idle, but it is a laptop and the backup can sometimes slow everything down if there are some large files being backed up.
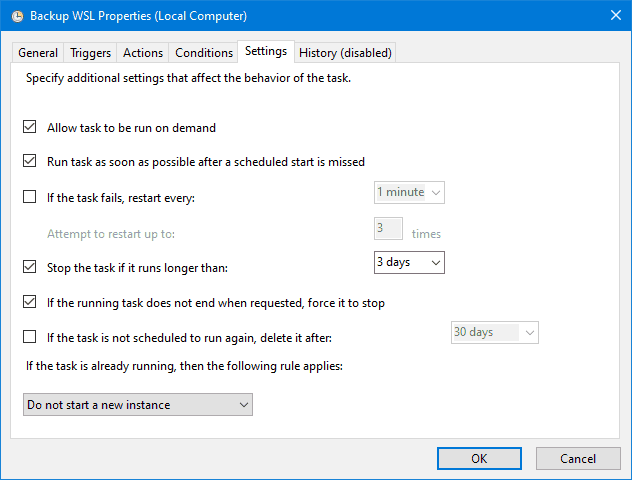
You can configure the settings however suits you best.
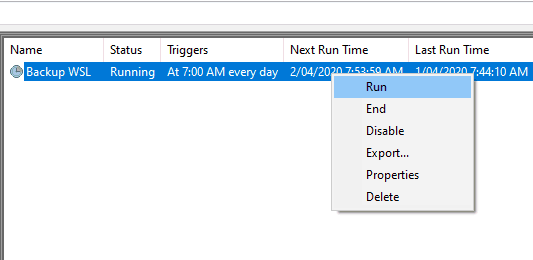
That’s it, you now have automatic backups of WSL2. With the task fully configured, you should be able to wait for the schedule to run at the configured time. You can also right click on the task in the list and select Run to manually trigger the backup to check it works.
Backing Up MySQL/MariaDB
If you have any databases (such as MySQL/MariaDB), you’ll probably want to keep a backup of that data as well. While you could get rsync to include the raw database files, that can easily result in corrupted data. So the alternative is to use a tool like mysqldump to dump the database data into a file. Once it’s in a file, you can easily include this in the rsync backup.
For my daily backups, I use mysqldump to dump all of my current databases into their own files within my home directory. These files are then backed up by rsyncinto Windows alongside everything else. I’ve wrapped all of this up inside ~/backup.sh , which I keep synchronised between my WSL2 instances.
My ~/backup.sh Script
This is the current version of my ~/backup.sh script. It includes mysqldump for my development databases and rsync for my files. Since I use it across all my WSL instances, it uses the WSL_DISTRO_NAME environment variable to work across all of my WSL instances automatically.
Note, you’ll need to allow sudo mysql to work without a password to automate the script.
#!/bin/bash

LOGFILE=/home/valorin/winhome/backup/${WSL_DISTRO_NAME}.log

if [ ! -e /home/valorin/winhome/ ]; then
    echo "ERROR: ~/winhome/ is broken, cannot backup ${WSL_DISTRO_NAME}" | tee -a $LOGFILE
    exit
fi

{
    echo "=====>"
    echo "=====> Starting ${WSL_DISTRO_NAME} Backup"
    echo "=====> "`date '+%F %T'`
    echo "=====>"

    if [ -d /etc/mysql ]; then
        echo
        echo "==> Backing up MySQL Databases <=="
        echo
        sudo service mysql status | grep -q stopped
        RUNNING=$?
        if [ $RUNNING == "0" ]; then
            sudo service mysql start
            echo
        fi

        DATABASES=`sudo mysql --execute="SHOW DATABASES" | awk '{print $1}' | grep -vP "^Database|performance_schema|mysql|information_schema|sys$" | tr \\\r\\\n ,\ `
        for DATABASE in $DATABASES; do
            if [ -f /home/valorin/db/mysql-$DATABASE.sql ]; then
                rm /home/valorin/db/mysql-$DATABASE.sql
            fi
            if [ -f /home/valorin/db/mysql-$DATABASE.sql.gz ]; then
                rm /home/valorin/db/mysql-$DATABASE.sql.gz
            fi
            echo " * ${DATABASE}";
            sudo mysqldump --opt --single-transaction $DATABASE > /home/valorin/db/mysql-$DATABASE.sql
        done

        if [ $RUNNING == "0" ]; then
            echo
            sudo service mysql stop
        fi

        chown valorin:valorin -R /home/valorin/db
        gzip /home/valorin/db/*.sql
    fi

    echo
    echo "==> Syncing files <=="
    echo

    mkdir -p /home/valorin/winhome/backup/${WSL_DISTRO_NAME}/
    time rsync --archive --verbose --delete /home/valorin/ /home/valorin/winhome/backup/${WSL_DISTRO_NAME}/

    echo
    echo "=====> "`date '+%F %T'` FINISHED ${WSL_DISTRO_NAME}
    echo

} 2>&1 | tee ${LOGFILE}
Summary
I’ve been using this backup method of automatic backups for WSL2 since I migrated over from WSL1 last year. It works really well with my workflow, and I usually don’t notice the backup window popping up every morning. It’s simple and minimal fuss, and doesn’t require any system changes to WSL2.
If you do any work or keep any important files within your WSL2, you’ll want to ensure it’s backed up. Coupled with Backblaze, I have WSL2 backed up locally and online, keeping my dev work safe.
I hope this has been helpful – please reach out if you have any questions about my approach. If you have a different approach to backing up WSL2, please share – I’d love to see how you solve it.
20 replies on “Automatic Backups for WSL2”
Very useful. Thank you!
Awesome thanks! Can you also share to us on how to restore?
Since this method only syncs the files, not the image/virtual machine, I just restore everything manually. So I’ll go through the fresh install flow and use
cpwithin WSL to copy the files from Windows (/mnt/c/into WSL and configure everything again. It’s not the fastest method, but it works for me. I generally prefer to start with a fresh install, install of reviving old config.You could sync the
/etcfolder as well, so you’ve got all of the config files to be restored, if you’ve got things configured in there too.I’m doing it the other way around: Backupping the home directory from windows. Since you can access the home via \\wsl$\, you could use robocpy etc. to back it up. The advantage (for me) is: Windows is the “host”, and alle important things are going on here, my WSL(2) distris are just “worker”. Plus I easily can copy the files to Cloud services, i.e. OneDrive which is much easier in Windows.
Just my two cents 🙂
Br,
Jan
I had no idea
robocopyeven existed, but it does sound incredibly cool. I went forrsyncin WSL because I knew how it worked, but if you can replicate the same sync from Windows, then that is definitely an option too. Does it wake up the WSL instance if it’s offline and you’re trying to access it via\\wsl$\?I noticed the original poster didn’t respond, but if you haven’t looked at it yet I can definitely report that robocopy is awesome!! Did it wake up WSL though? I thought it did if I manually just ran `robocopy` from the command line. But when I set up my backup in Task Scheduler in Windows I had to create a network drive for some reason — I think it was something to do with Task Scheduler permissions or something though.
But creating / waking the network drive was no big deal, I just created a simple batch file for Task Schedule posted below to create the drive, run robocopy, then remove the drive. So I never even notice this all happening when it runs and everything is kept nice and tidy.
“`
net use u: \\wsl$\Ubuntu
robocopy /mir u:\home\myuser\sites\ C:\ubuntu-sites-backup\
net use u: /delete
“`
Oooh, that is rather nice! I’m still using my rsync script for WSL backups, but that is very tempting.
That said, I do use robocopy to sync my laptop to an external backup drive.
Nice. Thanks.
Note: In my tests, rsync will occasionally mark things as not up-to-date due to permission differences only (Linux has permissions that conflict with what it gets from looking at the Windows copy of the file). I think what happens in this case is that rsync notes the difference, but since it is not a content difference no copying is done. Instead, rsync will just try to change the permissions of the target system. Since the target system is Windows, this attempt to change permissions is ineffective and basically a waste of time.
Bottom line: if instead of using –archive (which is equivalent to rlptgoD), you drop the permission related options (which do not really do anything anyway) and just use the -rltD, you may see a speed up for large amounts of files. At least, it did in my testing.
Awesome, thanks – I’ll definitely give it a try and see how it goes, performance wise. Anything to get the backup running faster is worth trying. 🙂
I don’t have a DB within WSL 2. I use it as a Linux system, that allows me to run windows apps as required by business. So the backup method I use, is based on 1 time per day, first time after 12 noon that I open WSL it backs me up to a specific drive (if attached) My code is here https://gitlab.com/linuxrebel/wsl-backup
Thanks for this really helpful article. However after a 1st run, I can’t manage to get rsync synchronizing only the files that have changed. It seems that it would always re-save all the files at every execution (and that’s a problem because it takes many time… I can understand this for a 1st execution, but why this is systematically taking so much time (and seems to copy the same files).
I’m pretty new to bash script, and did exactly what you suggested :
I created a `backup.sh` file containing :
“`
rsync –archive –verbose –delete /home/jm/dev /mnt/c/Users/jm/wsl2-backup/dev
“`
(I’m only interested in saving my ~/dev/ folder, which is my workspace. Everything else doesn’t matter to me)
Any idea of what could be wrong ?
(Also, I had to change the chmod of the script to 777 in order to make the Task Scheduler have the right permissions)
Thank you 🙂
I’ve seen that happen a couple of times. I’ve always assumed it’s just differences between the filesystems (win vs linux) that can cause rsync to think the file is changed. In some cases it has resolved itself, but others it seems to always copy each time.
There are some rsync options you could play around with like
--checksum, which use different comparison methods. They could result in a faster sync (with less files), although checksum may be slow if you’ve a lot of large files. So it’s a bit of a tradeoff to find the right option that works for you…You can find the options on the rsync manpage: https://linux.die.net/man/1/rsync
Thanks for the guide, it’s interesting and well explained…
I just wonder why not just go with `wsl.exe –export `?
That’s what I do and it gives me a .tar file with everything included. When I need to swap computers or do work somewhere else I can just do an `import` as I store my .tar file in MS OneDrive…
There are two reasons why I didn’t simply go for
wsl.exe --export:1. It requires the WSL instance to shut down during the export. Since I wanted to automate daily backups, I didn’t want a backup run to start while I was using WSL and force me to wait for it to finish. My method works while the instance is still running, so it doesn’t interrupt what I’m doing.
2. I wanted per-file backup versioning through Backblaze. Generating a single large tar per backup makes it impossible to search for a specific file in the backup archive. (I had to do this recently for a file I accidently deleted a few days prior, so this is critical for me.)
It sounds like your workflow is more of a multi-machine WSL sync than a versioned backup.
Not sure if I’m missing something or my setup has something different, but the initial rsync copy of my home directory (Linux to Windows on the same SSD) took around 5 hours to complete and a subsequent sync after the first work day required 66 minutes. As a comparison, wsl –export needs around 15 minutes and copying the raw SSD partitions into an external disk needs 5 to 10 minutes.
I only have a couple of web-based applications but, unfortunately, nowadays that involves like 100,000 tiny files and that’s hard to manage. 😢
I think you’ve hit the nail on the head with the 100,000 tiny files comment. rsync would take a significant amount of time to process each file, and even comparing them for changes would be an expensive process. Whereas the method used for the WSL export is probably very good at wrapping up lots of tiny files efficiently, as it’s compressing them together into a single file, not processing each individually and comparing each copy.
Trevor R suggested using Robocopy – you could try using that from Win instead of rsync in Linux. There is a chance it’d handle the tiny files better, although it might not.
You may just find that wsl –export is the best option for you.
Hi Stephen! Thank you for the detailed guide!
In the case with a lot of files, Robocopy probably won’t make much difference, the cross-system performance is poor from both sides. In my opinion, a good alternative would be backing up Linux files straight to a remote server with `rsync`, `duplicity` or `rclone`.
Thanks! 🙂
Going direct to remote from WSL would definitely cut out the Win10 hop, so if that’s a good option for you, then definitely go for it and save the extra bounce.
For my needs having a local backup is essential, to save excessive internet usage when I’m not at home. Backblaze handles the remote backup for me without maxing out metered connections.
Performance of Robocopy vs rsync is very different, especially when doing an entire home directory. The following is a full home backup and has all of the VS: Code stuff in it.
Both work the same in regards to file permissions in the backup directory, as Windows assigns the same permissions either way. Moving the file back into WSL via cp allows WSL to set the permissions for the file, so that they are done properly.
Looking at it from a performance/time standpoint this would cause me to use Robocopy over rsync for doing larger amounts of data in the backup.
RoboCopy pull from \\WSL$\Ubuntu
Speed : 15157379 Bytes/sec.
Speed : 867.312 MegaBytes/min.
rsync to /mnt/s/backupdir
sent 847,499,036 bytes received 233,641 bytes 2,338,572.90 bytes/sec
Thanks for this solution! It aided me in constructing my own backup solution for Sharepoint/OneDrive files (https://www.reddit.com/r/sharepoint/comments/xtuxj2/backing_up_sites_with_guest_access_only/?utm_source=share&utm_medium=web2x&context=3). I left a link to your article.