A relatively unknown and underused feature of Git is the ability to cryptographically sign commits. It is an optional feature that provides a way for the author of a commit to prove ownership. It uses the author’s GPG key to leave a signature in the commit that can be checked later. If you’re a Keybase user, it’s pretty easy to use your Keybase GPG key for signing your Git commits. Then, once you’ve your commits are signed, GitHub provides a nice interface for verifying commits have been signed and by whom.
This tutorial walks you though the process I took to set up Git commit signing with my Keybase GPG key. I went from not having a GPG key installed locally through to seeing my commits marked as Verified on GitHub.
Why should we sign Git commits?
A few days ago, I was at NDC Security and saw a talk by Phil Haack where he spoofed a “malicious” commit to look like it was made by Troy Hunt (who was also speaking). It may sound difficult, but it’s actually a very trivial process. Git will accept any name and email address as the commit author and so will GitHub. So if you set the author on the commit to be a valid email address, it will look like they made the commit. This is due to the distributed nature of Git, which allows anyone to push anyone else’s commits around. However, from a security point of view, it’s a problem.
Unfortunately, there isn’t a way to stop someone from spoofing a commit with your name and email. However, Git does support cryptographically signing commits using a GPG key. This allows GitHub to mark your commits as Verified when it can match your verified email to your GPG key. This won’t stop someone trying to spoof your commits, but it will provide assurance of your real commits so they can be properly verified.
GitHub and Keybase
GitHub provides a settings page for setting your GPG key, however if you upload your raw GPG key from Keybase, it will likely contain a Keybase user reference: [email protected]. This isn’t a live email address and therefore GitHub will be unable to verify it. It also won’t match the email address in your commits. As a result, we need to do a few more things to get everything working.
I tried looking through the Keybase options, but couldn’t find any default way to modify the key and add email addresses. This seems like an oversight to me, but my understanding of this is limited, so there may be a good reason. Ultimately, I needed to export my key from Keybase into GPG so I could modify it directly. It turns out that Git needed it in there anyway, so it all works out nicely.
Updating the GPG key
Before you begin, I’m assuming you have Keybase installed and working via command line, and you have a GPG key already in your Keybase account. I used Git Bash on Windows 10, because I find it easier than CMD or PowerShell, but can use your preferred terminal.
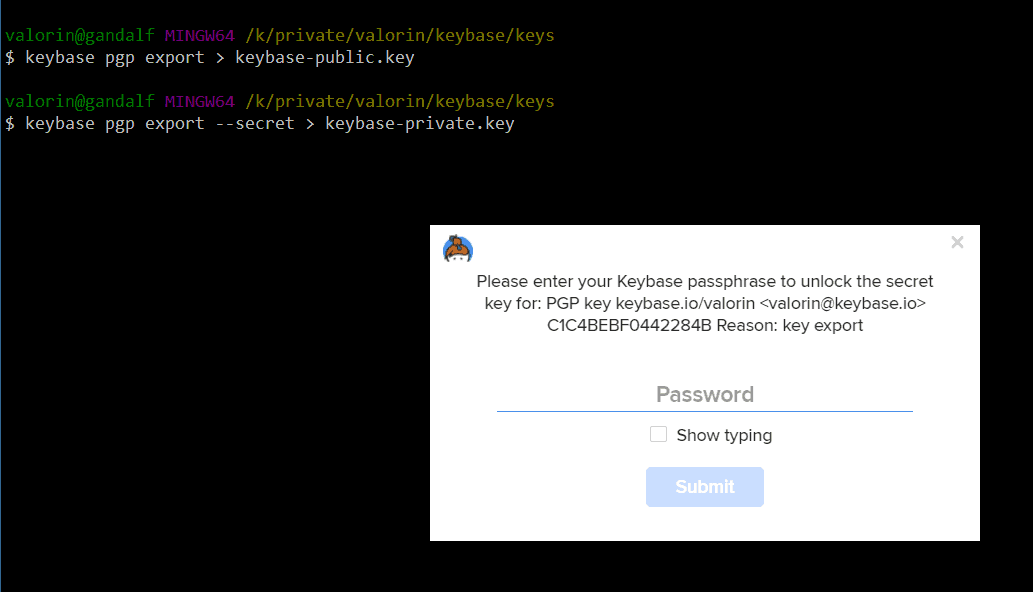
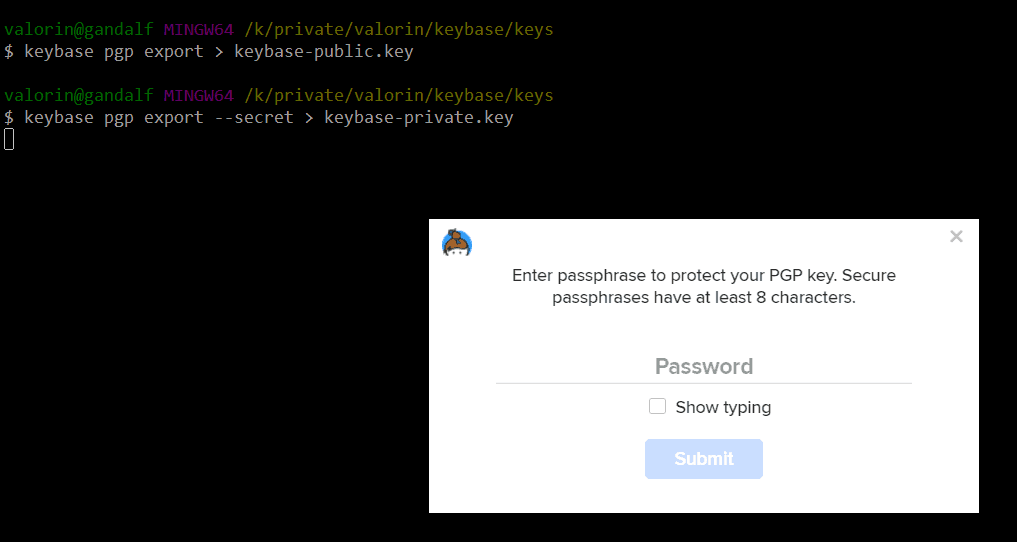
First, export your public and private keys from Keybase using the keybase pgp command:
keybase pgp export --outfile keybase-public.key
keybase pgp export --secret --outfile keybase-private.key
During the export process, Keybase will ask for your account password and prompt to set a new password for the private key file.
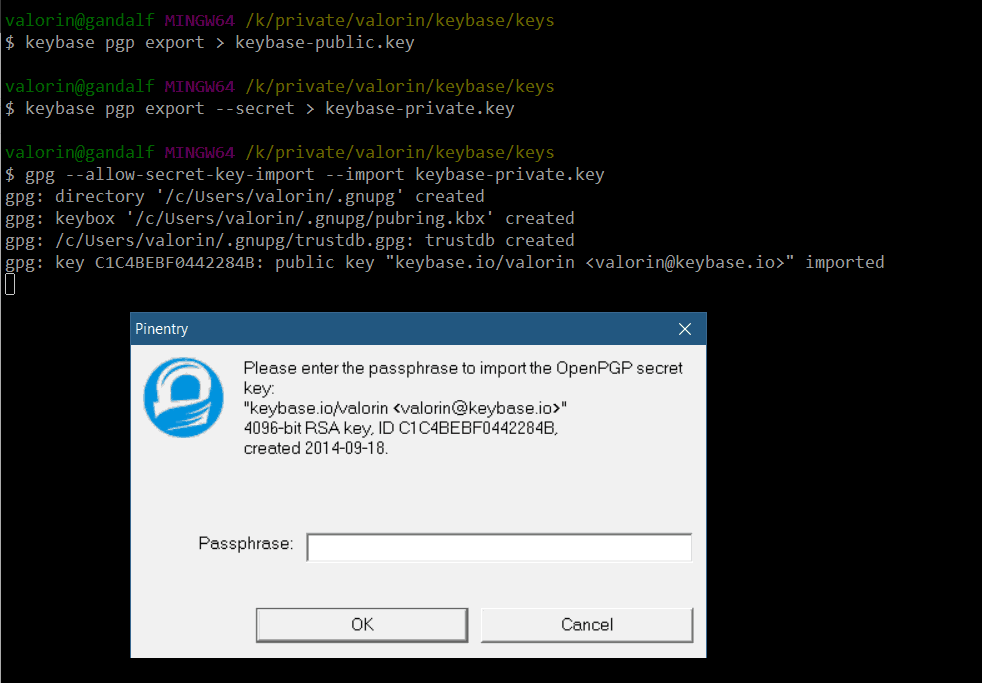
Next, you need to import the keys into GPG using the gpg command:
gpg --allow-secret-key-import --import keybase-private.key
gpg --import keybase-public.key
The import process will ask for the password you just assigned to your private key, for obvious reasons.
Modifying the key (adding a new user)
Now that you’ve imported the key into GPG, you need to modify the key to include your email address. This is done by invoking the gpg --edit-key command, with a unique identifier for your key. I found using the <username>@keybase.io address worked nicely.
gpg --edit-key <username>@keybase.io
This command will get you into the gpg> prompt, and from there you need to run the adduid command. It will prompt for your Real name and Email address (feel free to leave Comment empty).
gpg> adduid
Real name: <your name>
Email address: <your email>
Comment:
You selected this USER-ID:
    "<your name> <your email>"

Change (N)ame, (C)omment, (E)mail or (O)kay/(Q)uit?
Once you’ve provided your name and email, confirm using the O and then save to close the gpg> prompt.
The entire key updating process should look something like this. Note that since I had already added my personal email address prior to saving this log, it shows me adding my work email address as a third user onto the key.
$ gpg --edit-key [email protected]
gpg (GnuPG) 2.2.13-unknown; Copyright (C) 2019 Free Software Foundation, Inc.
This is free software: you are free to change and redistribute it.
There is NO WARRANTY, to the extent permitted by law.

Secret key is available.

sec  rsa4096/C1C4BEBF0442284B
     created: 2014-09-18  expires: 2024-09-15  usage: SCA
     trust: unknown       validity: unknown
ssb  rsa4096/3A829C5805933134
     created: 2014-09-18  expires: 2024-09-15  usage: E
[ unknown] (1). Stephen Rees-Carter <[email protected]>
[ unknown] (2)  keybase.io/valorin <[email protected]>

gpg> adduid
Real name: Stephen Rees-Carter
Email address: stephen@*********.com
Comment:
You selected this USER-ID:
    "Stephen Rees-Carter <stephen@*********.com>"

Change (N)ame, (C)omment, (E)mail or (O)kay/(Q)uit? O

sec  rsa4096/C1C4BEBF0442284B
     created: 2014-09-18  expires: 2024-09-15  usage: SCA
     trust: unknown       validity: unknown
ssb  rsa4096/3A829C5805933134
     created: 2014-09-18  expires: 2024-09-15  usage: E
[ unknown] (1)  Stephen Rees-Carter <[email protected]>
[ unknown] (2)  keybase.io/valorin <[email protected]>
[ unknown] (3). Stephen Rees-Carter <stephen@*********.com>

gpg> save
Once that’s done, you can push your updated key back into Keybase.
keybase pgp update
Trusting Your GPG Key
As Phil pointed out below in the comments, your private key is currently not trusted by GPG, and is listed as unknown. Since it’s our own key, we can quickly go in and tell GPG to trust it. If you’re going to the trouble of signing git commits, it’s important that when you audit signatures (for example, with git log --show-signature), you don’t see your signatures marked is untrustworthy.
This can be done by opening up the GPG key edit prompt again using gpg --edit-key <key> and selecting the trust option. I suggest using trust level 5 = I trust ultimately, since it is your own key. After applying the change, use save to close the prompt.
$ gpg --edit-key [email protected]
# ...
gpg> trust
pub  rsa4096/C1C4BEBF0442284B
     created: 2014-09-18  expires: 2024-09-15  usage: SCA
     trust: unknown       validity: unknown
sub  rsa4096/3A829C5805933134
     created: 2014-09-18  expires: 2024-09-15  usage: E
[ unknown] (1). Stephen Rees-Carter <stephen@*********.com>
[ unknown] (2)  keybase.io/valorin <[email protected]>
[ unknown] (3)  Stephen Rees-Carter <[email protected]>

Please decide how far you trust this user to correctly verify other users keys
(by looking at passports, checking fingerprints from different sources, etc.)

  1 = I don't know or won't say
  2 = I do NOT trust
  3 = I trust marginally
  4 = I trust fully
  5 = I trust ultimately
  m = back to the main menu

Your decision? 5
Do you really want to set this key to ultimate trust? (y/N) y

pub  rsa4096/C1C4BEBF0442284B
     created: 2014-09-18  expires: 2024-09-15  usage: SCA
     trust: ultimate      validity: unknown
sub  rsa4096/3A829C5805933134
     created: 2014-09-18  expires: 2024-09-15  usage: E
[ unknown] (1). Stephen Rees-Carter <stephen@*********.com>
[ unknown] (2)  keybase.io/valorin <[email protected]>
[ unknown] (3)  Stephen Rees-Carter <[email protected]>
Please note that the shown key validity is not necessarily correct
unless you restart the program.

gpg> save
Once saved, your key should now be listed with ultimate trust:
$ gpg --list-keys
gpg: checking the trustdb
gpg: marginals needed: 3  completes needed: 1  trust model: pgp
gpg: depth: 0  valid:   1  signed:   0  trust: 0-, 0q, 0n, 0m, 0f, 1u
gpg: next trustdb check due at 2024-09-15
/home/valorin/.gnupg/pubring.kbx
--------------------------------
pub   rsa4096 2014-09-18 [SCA] [expires: 2024-09-15]
      7C1C5C4A3017C21F9AE534DEC1C4BEBF0442284B
uid           [ultimate] Stephen Rees-Carter <stephen@*********.com>
uid           [ultimate] keybase.io/valorin <[email protected]>
uid           [ultimate] Stephen Rees-Carter <[email protected]>
sub   rsa4096 2014-09-18 [E] [expires: 2024-09-15]
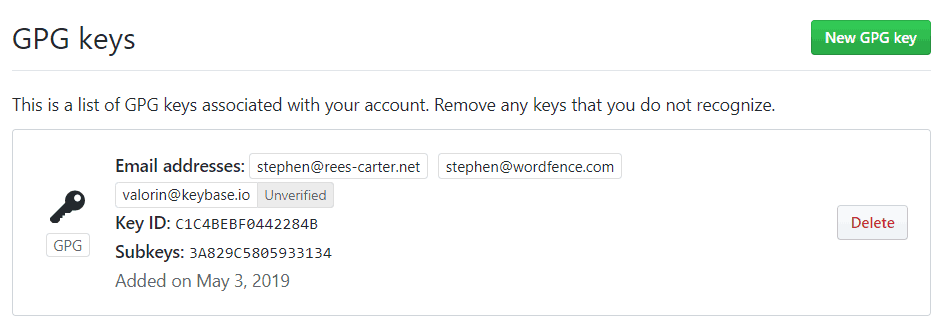
Adding the key into GitHub
The easiest way I found to get the public key is to go to your Keybase profile (i.e. https://keybase.io/<username>) and click on the public key in the identity list. A dialog will appear which includes a text box containing your public key. Copy this into the clipboard.
Then go to Settings > SSH and GPG keys in GitHub. Click the New GPG Key button and paste your public key in.
Sign Git Commits
The final piece of the puzzle is to tell your local git command to sign the commits using your key. This can be set either per-repository, or globally across all repositories in your computer’s current user with the --global flag.
Use the git config user.signingkey option to specify the Key ID for git to use. You can get this from the GitHub GPG keys page if you’re unsure what it is. For example, mine is C1C4BEBF0442284B.
You can also require Git to sign all commits with the commit.gpgsign option.
git config --global user.signingkey <Key ID>
git config --global commit.gpgsign true
Note, you will need to add your key to any computer/login that you use for commits to be signed.
Now, when you make any commits, Git will attempt to sign them with your key. It may ask you to unlock your key if you haven’t used it recently.

Supporting custom binaries (gpg2)
Some GPG installations require a different binary to the default that Git will try. To get code signing working, you may need to tell Git were the GPG program is located. This can be done with the gpg.program option:
git config --global gpg.program /path/to/gpg2bin
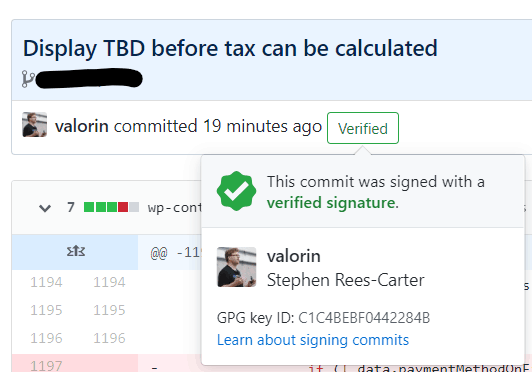
Verified Commits
Once you’ve set it everything up correctly, you will see the friendly green Verified indicator next to your new commits in GitHub.
That’s basically it. ?
Any future commits you from that computer/user will be verified, proving you are the author. Signing git commits won’t stop spoofing, but it will provide assurance of your real commits so they can be properly verified. I think that’s all we can do in Git for now.
Updates:
- 2020-05-02: Added “Trusting Your GPG Key” section, thanks to the suggestion from Phil in the comments.
- 2021-07-13: Added
gpg.programoption forgpg2support, thanks to William Roy for the suggestion.
8 replies on “Sign Git Commits With A Keybase GPG Key”
Thanks for such an excellent write-up! It got me all set up with Git + Keybase. The only thing I think it’s missing is trusting your key; when you edit the key you can use the “trust” command and set it to “ultimate” (5) so that when you audit signatures in git with “git log –show-signatures”, your commit signatures don’t show up as untrustworthy 🙂
Ah good point about trusting the key, I’ll update the post to include that step. Thanks Phil! 🙂
This may need a small update. gpg gets a readblock error when redirecting the stdout as you did. I opted for the –outfile which resolved this as below. Not sure if it was a version issue or not. Kleopatra also failed to read in the key with stdout until I changed the command to the below. I dropped my versions as well.
“`ps1
$ gpg –allow-secret-key-import –import keybase-private.key
$ gpg –import keybase-public.key
“`
$ gpg –version
gpg (GnuPG) 2.2.19
libgcrypt 1.8.5
$ keybase –version
keybase version 5.5.0-20200526130944+139bb348af
It must be an specific version issue – I used my original instructions recently and they seemed to work on Win 10 + WSL2.
That said, I love the suggestion of using
--outfile, so I’ve updated the post to reflect that instead of stdout. Thanks! 🙂Thanks for the awesome article!
In the “Trusting Your GPG Key” section, the command should be `git log –show-signature` (two dashes and signature is not plural).
Oops! Thanks for pointing that out, I’ll fix it. 🙂
on a ubuntu 20.04 server
i am getting
”
error: gpg failed to sign the data
fatal: failed to write commit object
”
after i git commit
i am 999% sure that my user.signingkey is correct
i have gpg and gpg2
both gives the same error
I’ve had that error, but only when my key was missing from the system. I’m not sure what would cause that to happen in other scenarios – try checking places like Stack Overflow for help, I’m afraid debugging gpg is outside my experience. Sorry. 🙁